Sunday, December 30, 2012

Homemade Marshmallow Cream and Oatmeal Scotchies!

Christmas is over and we are planning on breaking out the raclette for New Year's Eve before starting the traditional diets on Jan 1st. Before all that gets posted however I thought I would post the favorite two recipes that went on the plates this year.
Best Ever Fudge
(the secrets of creamy fudge? Homemade Cream and brushing down the pan)
Homemade Marshmallow Cream
Ingredients:
3 large eggs whites
1/4 cream of tartar
2 Tb white sugar
1/3 c. water
3/4 c. light corn syrup
2/3 c. sugar (to be used separately)
1/2 Tb vanilla extract

Directions:
Beat egg whites and cream of tartar until light and foamy. Sprinkle in 2 Tb sugar and beat until soft peaks form. Let sit. In a saucepan melt sugar and corn syrup in 1/3 c. water/ Bring to a boil and stirring continually bring to 246 degrees or firm ball stage. Take off heat and slooooowlllly drizzle in egg whites while beating. Beat 5-6 minutes (honestly, I use to stop early but it's better if you do the full time) till stiff, shiny, and beautiful!

My Favorite Fudge Recipe
Ingredients:
1 1/2 c. sugar
2/3 c. evaporated milk
2 Tb butter (real butter)
1/4 tsp salt
7 oz marshmallow cream (you just made enough for 2 batches)
1 1/2 c. semi-sweet chocolate chips (the better the chocolate the better the fudge)
1 tsp vanilla extract
1/2 cup pecans or walnuts (optional)
 
Directions:
Line a 8 inch dish with parchment paper or aluminum foil. In a medium saucepan boil sugar, evaporated milk, butter, and salt. Now for your secret to perfect fudge. Take a pastry brush and a cup of water. Dip the brush and when the mixture is boiling dip into the cup of water and really wet down the sides of your saucepan. A sweet elderly lady showed me this trick once for making divinity. It gets all the sugar granules that have crept up on the pan and keeps your fudge smooth instead of grainy! Keep stirring and boiling for 5 minutes or until candy thermometer reaches 234-240 degrees. The stirring also helps to keep the fudge from getting grainy or burnt! Remove from heat and quickly stir in marshmallow cream, chocolate chips, nuts and vanilla. Now use those muscles! The better you can beat the fudge the better the texture! Pour into 8 inch dish  and let cool. Enjoy!
 
Oatmeal Scotchies


I don't make these often. Something about these cookies makess me to lose all will power and self control. The butterscotch mixed with the oatmeal and cinnamon is the ultimate combination. My husband gets teased about liking butterscotch (I don't know, the guys in our family are wierd) but one taste and no one teases anymore.

Oatmeal Scotchies

1 1/2 cups all-purpose flour
1 teaspoon baking soda
1/2 teaspoon salt
1 teaspoon ground cinnamon
1 cup (2 sticks) butter or margarine, softened
3/4 cup granulated sugar
3/4 cup packed brown sugar
2 large eggs
1 teaspoon vanilla extract or grated peel of 1 orange
3 cups quick or old-fashioned oats
1 11-oz. package butterscotch chips

Preheat oven to 350° F.
Combine, flour, baking soda, salt and cinnamon in small bowl. Beat butter, granulated sugar, brown sugar, eggs and vanilla extract in large bowl. Gradually beat in flour mixture. Stir in oats and butterscotch chips. Drop by rounded tablespoon onto ungreased baking sheets. Yep, it's pretty simple and easy.

Bake for 10-12 minutes. Cool on baking sheets for 1 - 2 minutes; remove to wire racks to cool completely.


Wednesday, December 19, 2012

Banana Muffins

We have been making and eating fudge and I still have all those delicious ingredients for the plates to take to the neighbors but sick kids and Christmas shopping has gotten us a little behind. Last night we did take our browning bananas and make the best ever
Banana Muffins!
I got this recipe years ago from allrecipes.com It is my favorite and I have tried a few! It was submitted by Lisa Kreft. You can find the link here!
 Ingredients:
1 1/2 cup flour
1 teaspoon baking soda
1 teaspoon baking powder
1/2 teaspoon salt
3 bananas, mashed
3/4 cup white sugar
1 egg, lightly beaten
1/3 cup butter melted
Directions:
Preheat oven to 375 degrees. Lightly grease 12 muffin tins or line with muffin cups. In a large bowl mix flour, baking soda, baking powder, and salt. Set aside. (For this one I add these one at a time to the bowl after creaming all the other ingredients together. I start with the teaspoons and go to the flour with the mixure on high) In separate bowl beat bananas, sugar, egg, and butter. (The bananas are my kids favorite part. We keep them in the peels and my kids mush them lightly instead of mashing them. Then we peel and put them in the bowl.) Stir the flour mixture into the banana mixture and spoon into the muffin tins. Don't put in oven yet!!

Crumb Topping:
1/3 cup brown sugar
2 Tablespoons flour
1/8 teaspoon ground cinnamon
1 Tablespoon cold butter
Directions:
Mix together brown sugar, flour, and cinnamon. Cut in butter with two forks until it resemebles cornmeal (small crumbs).

Spoon crumb topping over muffins, place in oven, and bake for 15-18 minutes or until toothpick comes out clean!

Enjoy~
We woke up this morning to discover that our elf was enjoying the muffins as well.


Wednesday, December 12, 2012

Fancy Dinner Part 2 - Steak, Hollandaise, Asparagus

All the girls in our family agreed that our fancy mousse made in the morning needed a fancy dinner to surprise Daddy. We had previously decided to make rolls, steak strips, asparagus, and hollandaise sauce. Mmmmm
Taste of Home Easy Potato Roll Recipe

There it was, in my fridge, staring at me. The scooped out leftovers of the Potato Skins made here. What to do, what to do. Potato Rolls!

Ingredients:
2 pks active dry yeast (1/4 oz each)
1 1/3 cup water (used separately)
2/3 cup sugar
2 eggs
1 cup mashed potatoes
2 1/2 tsp salt
6 cups flour

 Add yeast to 2/3 cup of water. Make sure water is 110-115 degrees. My mom can do this by feeling it on her wrist. I turn on the hot and put a meat therm. under it.
 Yeast should start to fizz and bubble. It is okay to stir it gently to get it all in the water. I use to be scared to do that.
This is my oldest girl mashing our scooped out insides a bit. Not pictured is the sugar. It is measured at 2/3 cup and in my kitchen aid. Next add your 2/3 cup shortening and cream. Add eggs, potatoes, salt, yeast mixture and 2 cups flour. Whisk till smooth. Add remaining 2/3 cup water and replace whisk with dough hook. Gradually beat while adding remaining flour. Don't worry about kneading this dough (I have learned the hard way that not all dough has to be kneaded) but keep it up until you have a soft dough that forms into a ball. Add up to 1/2 cup more flour or Tablespoons of water if needed. Put your ball of dough into a bowl and cover for one hour. Punch down and cut into 15 pieces. My girls helped roll pieces and put them in a dish. Cover and let rise again, about 30 minutes.
Once risen they should look something like this. Give them a quick brush with olive oil or melted butter. Bake in a 375 preheated oven for 20 minutes. I turn mine around halfway through since my oven browns the back half faster.
 While the rolls are cooking we looked up our recipe for mock hollandaise sauce. I'm pretty sure I found this on allrecipe.com a long time ago but sadly did not credit the cook. It is not nearly as good or thick as the original but nice in a pinch and much easier. (I made homemade with my brother over Thanksgiving. It's kinda sad that he's a better cook than me!)
Blender Hollandaise Sauce
 
Ingredients -
Remember the egg yolks you didn't use in your mousse from earlier today? You're gonna need them. Yep, all 6
1 squirt Dijon Mustard
1 Tb lemon juice
2 dash hot sauce (such as Tabasco)
3/4 cup melted butter
 
Blend egg yolks with mustard, Dijon, lemon juice, and hot sauce. Pour melted butter into blender in a steady stream. Put blender in a bowl of hot tap water to keep warm.
 
 
 Asparagus
For some crazy reason my kids love asparagus. I think it is best slightly crunchy and not mushy. To do this wash your asparagus and break off the lower tougher end. It should snap off easily. Fill a medium saucepan with water and bring to a boil. Add asparagus and reduce to a simmer. A simmer is when the bubbles are just wanting to break into a boil but can't seem to muster enough energy. Parboil 2 minutes and immediately get those babies out of there.

 
 As soon as asparagus is done put it into a water bath. It slows the cooking down and keeps them firm.
Since the oven was still occupied by my potato rolls I decided to pan fry the 1/4 inch thick sirloin steak. Add a little olive oil to the bottom of the pan and turn to medium high heat. Season with whatever you have on hand. I used Adam's Reserve Sear N Crust. Cook 7 minutes on one side, flip, season 7 minutes on the next side. Grilling is really the way to go for steak but if you are pan frying keep checking it. If you push on the top and it feels like the fleshy part of your hand below your thumb it is medium rare - which I think is perfect.
Make sure to get those rolls out of the oven!
 
 At the last minute I fried a few leftover sausages we had. I have to admit to eating a few bites off my plate before remembering to take a pic. There was more green on that plate I promise! The girls loved the rolls and I forgot how much they fill you up! Daddy was surprised and everything was perfect. I do admit that we just couldn't finish the mousse after a meal like this. Everyone ate about half a cup and we put them back in the fridge to be finished tomorrow.


Fancy Dinner Part 1 - Chocolate Mousse

Alright, I am officially hogging the blog but remember yesterday when I bought all those scrumdidilyumptious ingredients? I also have a few leftovers I need to use. Today I started to put them into action. Since I don't want to kill ya all at once I thought I'd post tonight's dinner and then go over the Christmas plates tomorrow (unless someone else wants to post - I really don't want to be an all out blog hog!)
Part 1 - Make Dessert First (Dinner Coming Tonight with Part 2)
Every night we read to my kids. Right now Dad is reading the latest Percy Jackson but last night he had a meeting so I picked up my daughter's Dealing With Dragons by Patricia Wrede. If you haven't read any of her four Dragons books I highly recommend them (just don't read her 5th short stories - it's a little more adult). In the book we got to the part where the princess Cimorene must make dessert for dragons and doesn't have the time to make her signature Cherries Jubliee (going to have to try that someday). She decides to make mousse instead. As I was reading this out loud, talking about the folded cream and chocolate it was told to me that all this time my kids thought she was making chocolate mice. Today, since I had chocolate and cream on hand, we decided to show them what chocolate mousse really is. We decided to go with Bobby Flay's version

Ingredients -
(to make 7 crystal goblets)
10 1/2 oz of bittersweet chocolate (we used Nestle semi choco chips) (1 cup is 8 oz)
28 oz cold heavy cream
6 large egg whites
1 oz sugar ( 2 Tbsp is 1 oz)
Note ~ I have found that recipes often use measurements I don't have. To know what is what I found a conversion chart I liked and printed it off. It is now taped to the inside of my kitchen cabinet. I also have a small, inexpensive food scale. I love it.

 Melt your chocolate in a double broiler over simmering water. If you don't have a double broiler simply put an oversized metal bowl over a pan of simmering water. Older kids can help stir the melted chocolate. Once melted remove and let stand.
 Beat cream into a frenzy! Okay, it's actually soft peaks. Pick up the whisk and if the peak top falls over it is soft. I like using a kitchen aid for this. It is a lot faster. The recipe calls for the bowl being over ice. I just put my kitchen aid bowl in the freezer this morning and then once done transferred the whipped cream to another bowl.
 Separate your egg whites from your yolks. I like to pretend I am Audrey Hepburn in Sabrina when I do this. Crack, new egg! If you have never done this before there are awesome directions here:
Save the yolks for the hollandaise sauce we will make this evening!
Beat those eggs whites into another frenzy - once again so much easier with a kitchen aid but patience and a hand blender works. When the soft peaks form add the 2 Tbs or 1 oz of sugar. Keep whipping till you get hard peaks. My kids got a lesson on what peaks are.
 
 Pour your beautiful chocolate into a bowl (lovin' my spatula right about now) and add all your whipped cream at once. Fold (don't stir!). When just combined (you still see streaks) add your whipped egg whites. Fold a little more vigourously. Let the kids help and pass the spoon around to lick. Cover and chill in the fridge for at least 1 hour.


Your end result should not look like this. What can I say, it happens to the best of us. Actually, the mousse tastes fantastic - like chocolatey air. Our mousse however separated and didn't combine quite as much as I would have liked. I looked it up and we didn't let our chocolate cool competely. We figured we would just add a small slab of white chocolate and let everyone think it is suppose to be lighter in color!
 
Now, remember that I like working with leftovers? I have all those insides of my potato skins sitting in my fridge with 6 egg yolks. Tonight for dinner we will be having easy sirloin strips, potato rolls, and asparagus with easy blender hollandaise sauce. Stay tuned!! 


Tuesday, December 11, 2012

Texas Football

This morning I went to the store and bought a whole lotta butter, chocolate, sugar, cream, and various ingredients for yummy recipes to eventually take to the neighbors for Christmas. (Those delicious delicacies coming soon!) In Texas however, even while the lights are twinkling and the temperatures are dropping, we cannot ignore our football.

In our house we are usually college level fans but since this was rumored to be a heck of a game, and my hubby needs something to talk about the next day at the watercooler we decided to tune in.
Oh sad, sad day.....yes, the score was not nice but at least we were able to enjoy some football food while we wept.....

We have many recipes for game day but since this was a last minute decision and the game came on about the time the kids were getting ready for bed I stuck with an old favorite.
We call them Potato Skins
Yes, they are basic and most of you probably already know how to make them but honestly, when is the last time you actually did?
Ingredients:
5 pd bag potatoes - I had large reds in my pantry but russet is a popular choice or baby reds
~1 pd cheddar cheese (varies) - my favorite is sharp cheddar
3 oz bag bacon bits (I like the real ones)
butter or Extra Virgin Olive Oil
garlice powder
sour cream
avacado
salt and pepper
baby red tomatoes
 
Scrub your potatoes, stick them with a knife or fork about 4 times and pop them in the microwave. My microwave has a potato sensor button but you can start with 10 minutes, test them out (knife should slide through like butter) and keep adding minutes from there.
Hold potatoes with a paper towel because those babies are hot! Slice lengthwise and scoop out leaving about 1/4 inch all around. Combine oil, salt, and pepper and brush inside and out. If you prefer buttery goodness skip the oil  brush with melted butter and garlic powder. Place on highest rack and bake 10 minutes.
Carefully remove from oven and fill the insides with shredded cheese and bacon bits. Sneak a few of the bacon bits. Return to oven for 5 minutes. Check and see if cheese is melted to your satisfaction.
Can you smell them??? Ohhhh, they smell delicious. Now is the fun part. Once the cheesy goodness is out of the oven you get to eat as is or experiment. We have made varying plates in the past that added guacamole, shredded rotisserie chicken, pulled pork, BBQ sauce, sour cream, salsa, tomatoes, avacado....the ideas are endless. My favorite is to add a chunk of avacado, a dab of sour cream, and a slice of a baby red tomato. I think those particular toppings add a freshness to the dish. (pic at top)

My hubby likes them just like this. Loaded down and ready for the game!
 
~Just an note! For gameday we like to lightly salt our avacados and tomatoes. I know, I know, not healthy at all but that's not the point. Just eat all salads the next day to balance. Also, did you really think I ate all 5 pds of those potatoes!! As I mentioned in my previous post, I love things that freeze well and these surprisingly do! I am trying out freezing them with the cheese this time (I'll let you know) but usually I freeze them before adding the topping. Then all I have to do is reheat for about 10 minutes in the oven the next time with the toppings added and they taste great!


Thursday, December 6, 2012

I Can Resist Everything Except Temptation

Hello All!
 
My name is Tonia and the above quote by Oscar Wilde pretty much sums up my opinion on anything food related. I grew up in a home that centered all holidays, birthdays, and Sundays around food and I can still smell mom's bread baking, taste grandma's Christmas fudge, and tear up over the bags of onions grandpa chopped for Thanksgiving stuffing! Growing up I had a desire for culinary school. The dream is still in the future but I still love to learn all about cooking anyway I can. From the lovely lady next door who makes the perfect divinity to our Dutch friends, I badger everyone to show me their secrets! I tend to lean toward comfort food but with a recent diagnosis of reactice hypoglycemia I am learning all about sugar free, unprocessed, and high fiber. That means I now spend my days with the new, fun, fattening, and sigh....healthy meals my family loves. Armed with a spatula and the help of at least one of my five daughters I can't wait to hear your reviews, recipes, and opinions of the foods I love!
 
 
As the weather here in West Texas gets a little cooler I start craving Lupe's Restaurant. Growing up in California we ate at this little tucked away place at least once a month. My mother grew up with the owner's granddaughter and my grandparents had been frequenting Lupes since they opened. I remember being in elementary school and walking in to the waitress asking us if we wanted our 'usual'. We always started with Albondigas Soup and then went on to the Chile Verde. The owners never did give us the recipe but over the years my mom and I have found our own versions that are just as good! With the cooler weather, albondigas soup is yummy and freezable!
 
 
Albondigas Soup -
(I apologize for the camera shots. I am hoping I have been good enough this year that Santa might bring me a new camera for Christmas!)
 
 Ingredients -
Meatballs -                              
2 pds ground beef                     
1/2 cup uncooked rice              
2 tsp minced garlic              
2 Tbs flour                               
salt and pepper   
        Mix all meatball ingredients together and form 1 inch meatballs                
Ingredients -
Soup
2 quarts water
3 Tbs Better Than Bouillon Chicken Base (or equivalent chicken broth or cubes to equal 8 cups)
2 tsp dried oregano
1 tsp cumin
2 16 oz cans crushed tomatos
1 large onion - chopped fine
4 lengths celery - chopped fine
4 carrots - chopped fine (I shred my carrots and celery in my cuisinart)
2 potatoes washed and cut in small pieces
1 tsp minced garlic

Bring soup to boil. Drop in meatballs. Reduce to simmer (point where the bubbles have all but ceased, looks like it's just about to boil). Keep at a simmer for 35-45 minutes. I know, it takes awhile but it's so delicious and this amount feeds my family for 2 dinners. I freeze my extra in sealable tupperware.

 Now some people get a little nervous about the uncooked rice. The rice in the meatballs will not taste exactly like 1 minute rice. It is suppose to be a little al dente (that does not mean uncooked). If in doubt, try it - I think it's lovely!  If you don't like it that way you can use leftover or precooked rice and add that to the meatballs. Just make sure to adjust simmer time to 10 minutes instead of 30-45!
 

The final dish. We like ours with warmed corn tortillas or crusty french bread.
 
~Just a sidenote. I love Better than Bouillon. It is a base instead of a bouillon cube and the richness of the flavor is hard to match unless you are making your own broth. It costs more, and I am all about cheap, but if you can find a base in your store it is totally worth it! The bases are usually in a glass jar next to the soups. I have always found them on the top shelf.


Friday, November 30, 2012

And We're Back!

Well hello. It's been awhile. And I've missed you. A lot. Seems like it was just yesterday I was posting regularly...

Yeah, like 7 months ago. And even then I wasn't regular.

So sorry!

But I bring you good tidings in the form of another contributor to the wonderful blog. She's an awesome mother of 5, yes FIVE, girls. And she homeschools, which makes her even more awesome. Plus she loves to cook, and she is really good at it. Trust me, we've been lucky enough to have been invited over on quite a few occasions. Which also means she is patient and kind. Let's all hope she posts her world famous (well, in my world) potato salad recipe. Because it ROCKS!

Her name is Tonia. She, like Karen and me, lives in Texas. Her husband smokes a mean brisket (and chicken). And she'll be coming to you regularly on "There's No Cookin' Like Snow Cookin" which probably needs a new name, because she's not a Snow... hmmm. Any suggestions?

Now, onto why y'all come to this amazing blog. Recipes!

We just had Thanksgiving. I made nothing new - stuck to two kinds of sweet potatoes and the normal pies (cherry, pumpkin, chocolate, and apple/cranberry). But they were delicious as always.

However, I love new recipes, and I found some delicious looking ones in the most surprising of places...The Walmart ad. Yes, you read that right. And I don't apologize for that either.

I don't have pictures because:
1. I haven't even made these yet, they just look good.
2. We are in the middle of a kitchen remodel and not living at my house right now, so I'm kind of out of my element.
3. I'm feeling rebellious today.

So please, enjoy these festive Thanksgiving-ish, Christmas-ish recipes this holiday season!

TURKEY CASSEROLE:

4 cups leftover prepared stuffing, divided
4 cups coarsely chopped leftover cooked turkey
3/4 cup mayonnaise, divided
1/4 cup whole berry cranberry sauce
2 cups leftover mashed potatoes
1 1/2 cups shredded mozzarella cheese

Preheat oven to 375°. Spray 8" baking dish with no-stick cooking spray. Spoon in 2 cups stuffing; top with turkey, combine 1/4 cup mayonnaise with cranberry sauce; spread evenly over turkey. Combine remaining mayonnaise, potatoes, and cheese in large bowl. Spread on turkey; top with remaining stuffing. Bake 40 minutes or until heated through. Let stand 10 minutes before serving.

PUMPKIN, SPICE and EVERYTHING NICE MUFFINS

1 pkg. spice or carrot cake mix
1 can (15 oz) pumpkin puree
3 large eggs
1/3 cup water

Combine cake mix, pumpkin, egg and water in large bowl and mix until moistened. Beat on low speed for 30 seconds; scrape bowl. Beat on medium speed for 2 minutes. Spoon batter into prepared muffin cups, filling 2/3 full.

Bake for 18-22 minutes or until wooden pick inserted in centers comes out clean. Cool in pans on wire racks for 10 minutes; remove to wire racks to cool completely. Store muffins in covered container.

Mmmm...PUMPKIN MOUSSE

1 box (3.4 oz) vanilla instant pudding & pie filling mix
1/4 tsp. pumpkin pie spice or ground cinnamon
2/3 cup (5 oz. can) evaporated milk
1 cup pumpkin puree
2 tbsp. sugar
1 1/2 cups thawed frozen whipped topping

Combine pudding mix and pie spice in medium bowl. With whisk, add evaporated milk; mix until well blended. Add pumpkin; mix well. Gently fold whipped topping into pudding mixture. Spoon into serving dishes. Top with additional whipped topping and pie spice, if desired. Serve immediately or cover and refrigerate. Makes 6 servings.

PUNCH UP YOUR PARTY
24 oz. 7UP
32 oz. Hawaiian Punch
1/4 cup 100% lemon juice
16 oz. Ginger Ale
12 oz. Orange Juice
1 pint raspberry sorbet

Wednesday, May 9, 2012

Strombolli


You can't get buch easier than this recipe.
You can even use canned or frozen bread dough if you do not want to make your own.

STOMBOLLI
1 lb bread dough (half of this link's recipe)
1/2 lb salami
1/2 lb ham
1/2 pkg pepperoni
1/2 lb grated cheese
1/4 cup grated parm cheese
italian seasoning
pizza sauce

Roll out dough in rectangle shape.
Layer meats in row down the long side.
Add cheese and sprinkle seasoning on top.
Roll up dough into log shape, sealing edges.
Bake at 375 for 25-30 minutes.
Wait about 5 minutes before cutting.  Serve with sauce for dipping.

That's it!  I sometimes add turkey or pastrami as well, really whatever I have on hand.


Wednesday, May 2, 2012

Healthier Sweet and Sour Chicken

This recipe is from eatbetteramerica.
Healthified Sweet and Sour Chicken

2 teaspoons canola or olive oil
1 lb boneless skinless chicken breasts, cut into 1-inch cubes
1/4 teaspoon salt
1 green bell pepper, cut into 1-inch pieces
1 red bell pepper, cut into 1-inch pieces
1 small onion, sliced into thin wedges
1 cup reduced-sodium chicken broth
1 can (8 oz) pineapple chunks in unsweetened juice, drained and liquid reserved
1/4 cup rice vinegar
1/4 cup brown sugar
4 teaspoons cornstarch
1/8 teaspoon crushed red pepper flakes
4 cups hot cooked instant brown rice
1 In 12-inch nonstick skillet, heat oil over medium-high heat. Sprinkle chicken with salt; cook and stir 4 to 5 minutes or until chicken is no longer pink in center. Remove from skillet.
 
2 In same skillet, cook bell peppers and onion over medium-high heat 3 to 5 minutes, stirring frequently, until vegetables are crisp-tender. Return chicken to skillet.

3 In small bowl, mix broth, reserved pineapple liquid, vinegar, brown sugar, cornstarch and crushed red pepper flakes; stir into chicken mixture. Add pineapple; heat to boiling. Reduce heat; cook uncovered, stirring frequently, until sauce is thickened and bubbly. Serve over rice.

Monday, March 19, 2012

Eggs-travaganza

So, anyone need a tutorial on hard boiling eggs? We are rapidly approaching Easter and potato salad season, plus we've had to have our annual Green Eggs and Ham St. Patty's Day dinner this week. I've been boiling eggs like crazy around here.

Seems simple enough, right? Unless you're like me and you're always a little unsure what the best method really is.

There are three main methods. Cold water method, hot water method and the newly discovered (and thoroughly disliked by me) baked method. You can also steam them, but I couldn't find enough information to feel good enough about passing on that information, and since I've never done it...

Obviously the concept is the same, cook the eggs, then cool immediately for easier peeling. I like to prepare an ice water bath to put the eggs in once I pull them out of the water. It's so much easier than running cold water over the hot eggs, cools them more quickly and evenly and since we don't have cold tap water in the summer, it's the only way I can do it.

A few hints: 

Fresh eggs are harder to peel. Seriously, they are. I thought this was just an old wives' tale until the last batch that I did, and the three fresh laid eggs in the batch were a beast to peel. Take my word for it, store bought eggs are fine, freshly laid eggs should wait a few days before being hard boiled and peeled.

The ice water bath also makes it immensely easier to peel the eggs. If you fail to cool the eggs well they continue to cook, and they are hard to peel.

Of the three methods described below I always do the hot water method. Why? Because I can multi-task more without worrying about forgetting something. You only have to time the eggs while in the water, instead of watching the water reach a boil, then timing. For busy brains like mine, the hot water method is the way to go, but remember....place the eggs in the hot water GENTLY, or you will have something that looks like egg-drop soup. Only nastier.

I've only tried the baked method once, and I'll never go back. The eggs were harder to peel, and the eggs had little brown marks from the racks which made my kids think they were gross...I know, it is probably just my kids...

COLD WATER METHOD: Place the eggs in a suitable pan with cold water to cover about 1/2 inch over the tops. Place on the burner and cook until the water reaches the boiling point. Turn off the heat and cover. Let stand for 15 minutes and then cool quickly under cold running water.

HOT WATER METHOD: Place enough water in a suitable saucepan to cover the eggs 1/2 inch over their tops. Bring the water to a rolling boil and then add the eggs by gently placing hem in the water with a spoon. Turn the heat back to just below simmering, cover and cook for 20 minutes. Place the eggs under cold running water immediately.

BAKED METHOD: Preheat oven to 325°. Place eggs in oven situated so they won't roll around, without touching other eggs. Bake for 30 minutes. Place immediately under cold water.

Saturday, February 25, 2012

Playtime!

I have tried several different play dough recipes and have a new favorite!

It's soft and squishy and doesn't dry out fast like the last one I tried.


Play Dough
1 cup flour
1 cup water
1/4 cup salt
2 tsp. cream of tartar
1 Tbls. vegetable oil
food coloring (I used 4-6 drops)

Just dump all the ingredients into your pot and mix.
Put your pot on the stove and cook over medium heat, stirring constantly, until it forms into a still ball.
Remove from heat and dump it onto wax paper.
Wait for it to cool, then knead it a few times until it is nice and soft.

Wednesday, February 22, 2012

Priorities

This blog has obviously been a little neglected lately. It's pretty much been the lowest of my priorities lately, with my new found love of crocheting edging it out. But just barely.
I do have some exciting news though, which does have to do with the blog. I've been working on some new and fun recipes, that will work for the freezer. Not necessarily Once a month cooking, but recipes that are still freezer safe. You see, I've been hired to cook a few meals a month for a family, which is allowing me to work on new recipes that are family friendly and freezer safe.

I guess crocheting and meal planning (Oh, and Pinterest...) have been pushing out blogging.

However, all excuses aside, I owe you a recipe. It's well overdue...so here goes...

BAKED FRENCH TOAST

Because if you've read this blog at all you know we eat a hot breakfast every single morning, and I'm not a morning person, and if I can simplify the process at all I will. And you can, with this recipe.

BAKED FRENCH TOAST


1 loaf of french bread cut into cubes (trust me, you want a crusty thick bread or it will be mushy)
1 pkg (8 oz) cream cheese, softened
8 eggs
1 1/2 cups milk
2/3 cup cream or half and half
1 1/4 cups syrup (I used buttermilk syrup because I have a love/hate relationship with maple, but it would work too)
1/2 tsp. vanilla
powdered sugar


Grease 9x13 in. baking pan. Beat cream cheese until smooth. Add eggs, mixing well. Stir in milk, cream, 1/2 cup syrup, and vanilla until smooth. Pour cream mixture over bread, cover and refrigerate overnight.


Next morning, pull baking dish out and let stand for 15-20 minutes at room temperature. Preheat oven to 350°. Bake uncovered for 45-50 minutes, or until a knife inserted in the center comes out clean. Pour remaining syrup over dish and sprinkle with powdered sugar.

Saturday, January 28, 2012

Square Dance

My kids get to take turns picking the treat for our weekly Family Night. It's kind of funny to see what they choose when no one else can influence their decision. We've covered most of the favorites, ie: Tres Leches cake, ice cream, pink cake with pink frosting, brownies, and the funniest (at least to me) M&M's.

This week the request was Lemon Squares.

I don't make my Lemon Squares very often, because they're probably my biggest weakness. They're light enough to taste calorie free, but they're not... I got the recipe in a Bisquick recipe book years and years ago. If you don't have Bisquick I don't recommend substituting, this is pretty much the only reason I have Bisquick in my pantry...but it's worth it.

GLAZED LEMON SQUARES

1 cup Bisquick baking mix
2 tbsp. powdered sugar
2 tbsp. firm butter
3/4 cup granulated sugar
1/4 cup flaked coconut, if desired
1 tbsp. Bisquick baking mix
2 eggs
2 tbsp. lemon juice
2 tsp. grated lemon peel
Glaze (see below)

Heat oven to 350°. Mix 1 cup baking mix and the powdered sugar. Cut in butter. Press in ungreased square baking dish, 8x8x2. Bake until light brown, about 10 minutes.

Mix remaining ingredients, except Glaze; pour over baked layer. Bake until set, about 25 minutes. Loosen edges from sides of pan while warm. Spread with Glaze. Cool completely; cut into 1-inch squares.

GLAZE: Mix 1/2 cup powdered sugar and 1 tbsp. lemon juice until smooth.

Thursday, January 26, 2012

Salsa!

I think I could eat chips and salsa every day. Totally not kidding. But I'm kind of picky about my salsas. I like tangy, and fresh, sometimes sweet. My mom brought us some mango salsa, pineapple salsa and peach salsa. They're really good, but I can eat only a little because they're pretty sweet.

I decided to make some Salsa Verde (that's green salsa to you non-Spainglish speaking people...) the other day. I had some cilantro, tomatillos, and jalapenos on hand, so it was perfect. I made up the recipe, without measuring, like normal, so here's some approximate measurements...sorry.

SALSA VERDE

1 bunch cilantro, chopped
6 jalapenos, seeded
6 tomatillos, diced
3 cloves garlic, minced
lime juice
salt
black pepper

Blend all ingredients together.

I also love just regular tomato salsa. I received this recipe a year or so, and it's delicious!

FRESH TOMATO SALSA

1 yellow onion
2-3 jalapenos (seed them if you want to reduce the heat)
2 cloves of garlic
1/2 bunch of cilantro
1/2 tsp. black pepper
1 tsp. chili powder
1 tsp. cumin
1 tsp. sugar
1- 28 oz. can whole tomatoes (or just slice up some ripe tomatoes)
1- 8 oz. can tomato sauce
1/2 cup fresh squeezed lime juice
1 tsp. white vinegar

Chop all ingredients up, or just dump into a blender and blend.

Tuesday, January 24, 2012

I Eats My Spinach

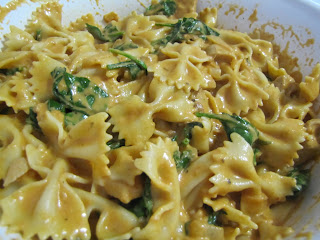
Shane is a finicky salad eater. We both dislike iceberg lettuce, but he's not even a fan of some of the more substantial lettuces, like romaine, butter or leaf. However, he does like spinach salads, so....I buy big containers of baby spinach at Sam's Club. Then, sometimes I don't feel like eating spinach salads every night, and I need to use the spinach up before it goes bad, so we eat something like this...

RIGATONI FLORENTINE

Sounds kind of fancy, right? It's delicious, the kids liked it, and it had hidden (well, sort of) nutrients for the kids.

I found it here on Allrecipes.com by using their ingredient search. I love that I can put whatever ingredients I have on hand, or that I need to use, and recipes will come up every single time.

PASTA FLORENTINE (because I didn't use Rigatoni, I used bowtie...)

1 (16-oz.) package of pasta
2 tbsp. olive oil
2 pounds boneless chicken, cubed (I only used 1 pound, my kids don't really eat meat)
3 cloves garlic, chopped (I minced it)
1 pint heavy cream
26 ounces spaghetti sauce
10 ounces fresh spinach, washed and chopped (I didn't chop mine, I missed that step)
1 cup shredded mozzarella cheese (I didn't use it, I was out, didn't want to go to the store...it worked ok without it, but I'll bet it's even better with it)

1. Bring water to boil and cook pasta to al dente, approximately 8-10 minutes.

2. In a large skilled, heat oil over medium-high heat. Add chicken and saute until cooked through and no longer pink inside. Add garlic to skillet; saute until golden. Add cream and spaghetti sauce to skillet; cook over medium heat for 10-15 minutes or until sauce thickens.

3. Add cooked chicken and spinach and cook until spinach reduces. Then add pasta; toss with cheese and serve.


Friday, January 6, 2012

Feeling Our Oats

I think I've mentioned a time or two, that we've been diligent about having a prepared breakfast with the kids before school each morning this year. Yes, this is a new thing. We used to do "hot" breakfasts only on the weekends, because our school provides a breakfast each morning and I just didn't want to get up any earlier.


Yes, I love my sleep. And I love my kids happy, which comes from them getting more sleep.


And yes, I love how this year is going, it's so much better, even with the lack of sleep. I love knowing what is going into my kids stomachs for every single meal. We try to eat pretty healthy, and relatively package free, I can't say the same thing about school food.


However, with the introduction of another meal to prepare each day came a whole new obstacle. Not getting stuck in the breakfast rut, like I sometimes get bogged down in for lunch menus. I spent a long time preparing a list of foods that were our old stand-bys and I've done some fun research since then to find variations to the same things.


Today, we're going to address oatmeal. Oatmeal can be sooo good, and it can be sooo bad. I am not a fan of slimy, gooey oatmeal. I want the oats to still have some bite, and not resemble something you would encounter when you have a cold. I know, gross. So is slimy oatmeal.


We've tried three oatmeal recipes since school started. One was something I had in my recipe box from who knows where, then we tried this one, and then this morning we tried this one. All of them were tasty, all of them were relatively healthy (think fiber, dairy and vitamins), but one was a clear winner in our household.


Let's countdown from #3 to #1...


#3 comes to us from a package of quick oats from the Church storehouse. It's the easiest recipe of the three, and also the fastest to prepare. It's not bad, particularly if you add brown sugar, or maple syrup, or fruit. It's an easy standby for a rushed, cold morning.


CREAMY OATMEAL


4 1/4 cups water
1/2 tsp. salt
2 cups uncooked oats
1 tbsp. powdered milk
1 tbsp. sugar


Bring water and salt to a boil. Stir in oats and reduce heat. Cook about 5 minutes, stirring occasionally. Increase or decrease water for thinner or thicker oatmeal. Add powdered milk and sugar and stir well.  Makes 4 cups of cereal.


#2 was one of the first things I found on Pinterest (yes, I'm now part of one more time-sucking social network). I'm giving it number two because it has the potential to be so much better than it was this morning. It's easy, because it's a crockpot recipe. It's tasty enough. However, because I thought about doing this late last night, I used regular oats, instead of steel cut oats. I'm hoping it's a little less slimy with steel cut oats... If not it's still easy, tasty and filling.


APPLE PIE BREAKFAST
Originally found at http://www.cookingwithjax.com/2011/01/apple-pie-breakfast.html


1 cup steel cut oats *
3 diced apples
1 cup apple juice
3 cups water


For best results: Combine all ingredients in slow cooker and cook for 2-4 hours on high or 4-5 hours on low until it reaches the consistency that you like. Be sure to stir every hour or so.


You can also cook longer without stirring as often, but you have to add more water liquid and it does come out a bit mushier. Add an extra cup of liquid for 7-8 hours in slow cooker. (btw, I cooked it for 6 hours on low, it sat for 2 hours on warm and I added no extra liquid but I also used regular oats, not steel cut...)


* It must be steel cut oats, regular oats get very soggy when cooked this way. You can find steel cut oats in your local grocery store (sometimes they are called "Irish oats" or "pinhead oats").


#1 is the clear winner at our house. It's a little less healthy, a little more time consuming, but it's match has not been found here at the Snow house. It provides grains, dairy and protein and Cael will eat it without complaint (which is huge). I wake up, prepare it, but it in the oven to bake and then go wake the kids up, by the time they're ready for school the food is ready to eat. Simple, right?!? 


I'm a huge fan of Our Best Bites, and this is indicative of the quality of recipes you'll find on their site.


BAKED OATMEAL
Originally found at http://www.ourbestbites.com/2011/02/baked-oatmeal/


3 cups regular oats (though in a pinch I've used quick oats and it was still really good)
3/4 cup brown sugar
1 tsp. salt
2 tsp. cinnamon
2 tsp. baking powder
3/4 cup craisins, raisins, etc.
1 cup milk
1/2 cup butter (1/4 cup can be replaced with applesauce)
2 tsp. vanilla
2 eggs


Preheat oven to 350°. In a large bowl combine the oats, brown sugar, cinnamon, baking powder, salt and craisins.


In a smaller bowl, mix together the milk, butter, vanilla, and eggs. Add the liquid mixture to the dry and stir to combine. Pour into an 8x8-in. baking dish. Bake for 40 minutes or until golden brown. Serve immediately with warm milk. Serves 8.